Saturday, August 17, 2013

Influenster Palmolive Soft Touch Prize Pack

From the Palmolive Soft Touch Influenster campaign I won a prize pack, which came in the mail Friday!   If you'd like to read my review on Palmolive Soft Touch dish soap you can find that right HERE.


It included


Soft Soap hand soap, rich shea butter, coconut scented $3.92 for a 4pk or $3.47 for a 28oz refill
You can find this HERE.  We actually use Soft Soap refills for our hand soap dispensers at home, and coconut is one of my favorite scents in the world, so this was wonderful. It's a lovely hand soap. It leaves my hands soft, silky smooth, and clean feeling. The scent if fantastic, very strong when you're washing your hands but quickly dissipates afterwards, it definitely doesn't linger very long which is something I love. I hate having my soap scent mingling with my lotion or perfume. I feel like soap should smell delicious but shouldn't linger on my skin longer then it takes to wash it off. This fits the bill nicely. Soft Soap comes in a variety of scents, and they are always coming out with new ones and updated character themed dispensers, so there really is a soap for everyone.


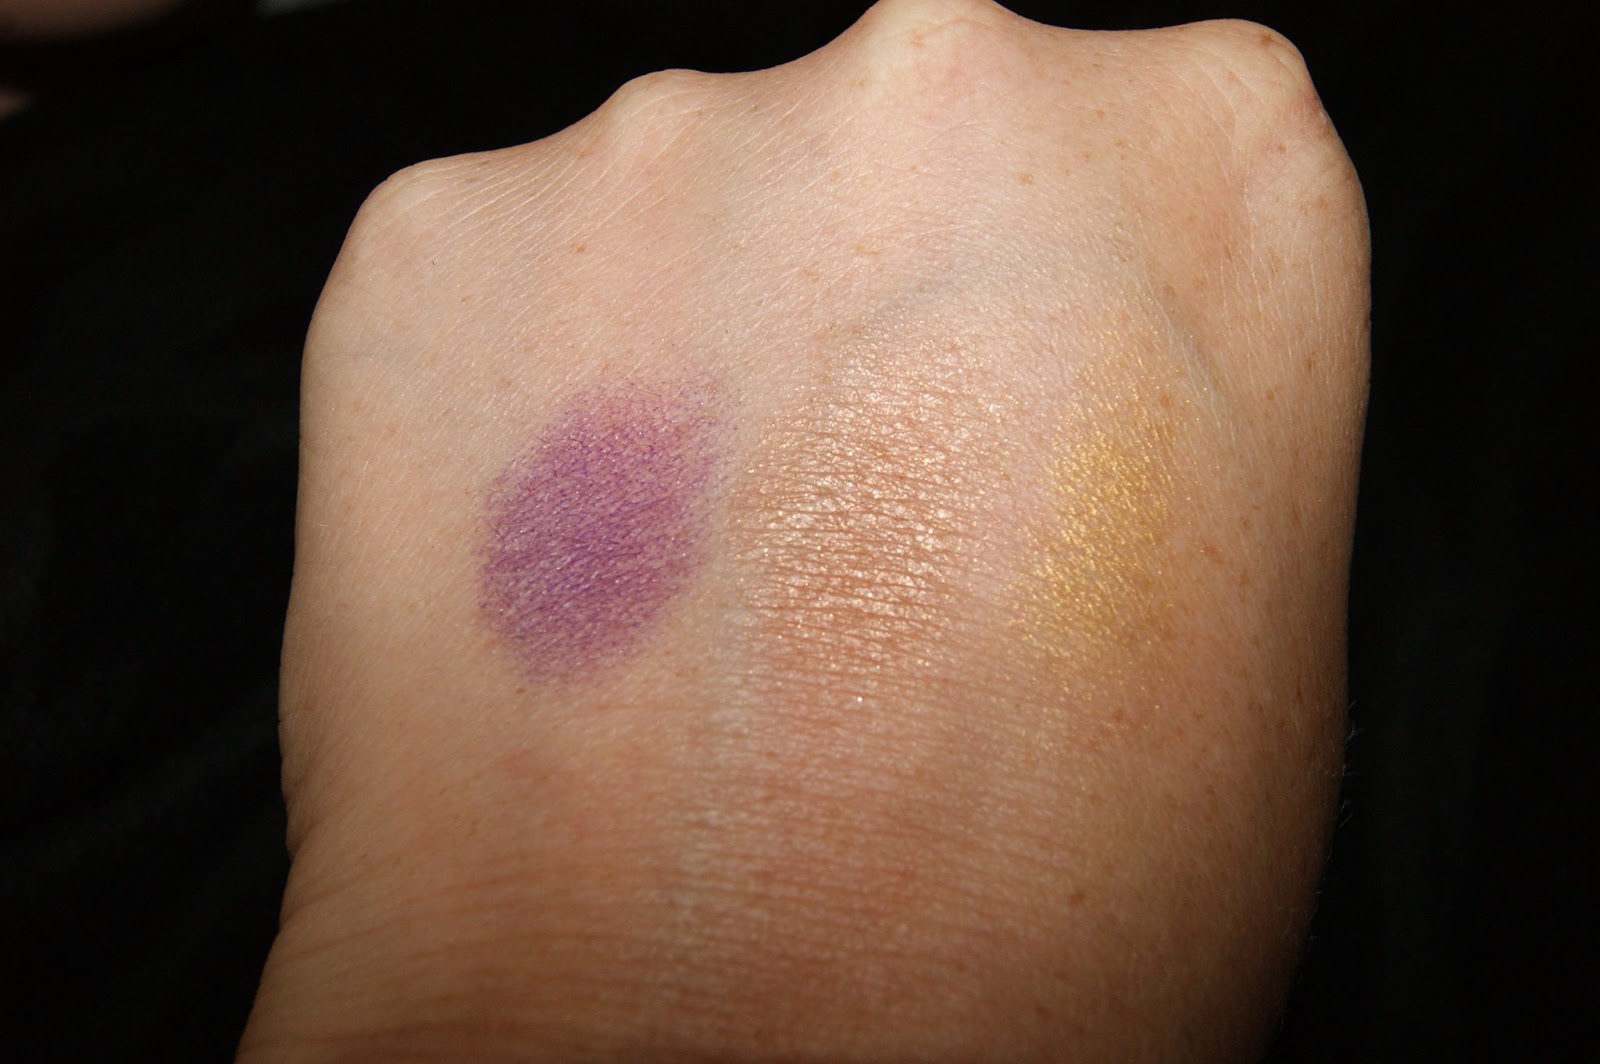
It looks much more blue then green in the photo, I tried everything to get the green to come out in the pictures like it does in person but it just would not work with me. It's much more of a green blue then it is a blue.

Sinful Colors Professionals nail polish in Aqua #10  I couldn't find a price online.
You can find this HERE.  I'm had a heck of a time finding this in an online store and even when I found it at Walgreens it only said "Priced in store". My first impression of this is that it was more of a shimmery blue in the bottle. I loved it immediately. However, when I put in on my nails it ended up drying to a metallic green. It makes me think of mermaids, if a mermaid wanted to paint her nails this would be the color she would pick. Aqua is a pretty green, it's just not what I wanted it to be from looking at the bottle. It's extremely shiny, I didn't put a top coat on this one because I didn't feel like it at the time and I didn't really need it. Quite obviously, if you wanted it to last a bit longer, you'd probably want to put a top coat on there. It took about 2-3 coats to make this opaque, with no streaks at all. It dried fairly quickly, quicker then my normal nail polishes, less then 5 minutes with 3 coats. This didn't chip for almost a week on me, and I'm very hard on my hands, I'd also like to add that this is without a top coat. It ended up chipping because I was using sandpaper and nicked my nail. The other nails didn't start to chip until this week, which is 2 full weeks after I painted this on. And even then, it was just around my tips. I'm extremely impressed with this nail polish! I don't think I've ever had a polish last this long on my nails before. As I said, I'm pretty hard on my hands, I sometimes don't use a top coat, and my nails are very soft so they bend easily and the polish normally cracks. Overall this is a fantastic nail polish!


and a package of imPRESS press on manicure nails in Stiletto #060 $4.97-$6.97
You can find this HERE. The imPRESS press on manicure nails boast no drying time, lasting shine, easy removal, and lasts up to a week. I've never had luck with press on nails. I can't get mine to last more then a day or 2, depending on when I wash my hair. I swear my hair annihilates fake nails like crazy.  That being said, these are really easy to put on, there isn't any drying time, they are a perfect length not too short not too long, and the shine can't be beat. If you wanted a quick solution for a night out if your real nails were in rough shape, this would be perfect!  Stiletto is an... interesting color. It's basically a light cocoa brown with a slight reddish hue to it. I think it's ugly. I can't even tip toe around that one. I'm not a fan of brown nail polish in general. These do come in tons of colors and patterns though, the zebra ones are fantastic, so there's something for everyone. If you go to the website above you can get a $1.00 off coupon on a pack of your very own! I would use these, probably for an event or just a night out, but in a different color or pattern for sure.

*I received these prizes complements of Influenster for being active in the Palmolive Soft Touch campaign. These are my true and honest opinions, I do not get paid to give good reviews. *


If you would like to sign up with Influenster or learn more about them you can find them right HERE.

I hope you, at the very least, consider check out the Sinful Colors Nail Polish! I can't even get over how impressed I am with the lasting power of it.

Enjoy

Friday, August 16, 2013

August Glamour Acadamy Ipsy Glam Bag!


This month's ipsy glam bag is super cute deep plum colored with a gold crest (reminiscent of Hogwarts' school crest!) saying Ipsy Glamour Academy.  I actually got this a little later then I normally do, I read something on their site that they were having a slow shipping month. But here we are!


Michael Todd true organics Pumpkin facial mask $34 for 3.4 fl oz
You can find this HERE.  My sample size is 1 fl oz, which means at 3.4 fl oz this full size is huge for a facial mask. Well worth the $34 for the amount of product you'll get in my opinion. This is a super thick paste, much thicker then other facial masks I've come across. It literally looks like they pureed pumpkin, removed the water, and bottled it. It is orange like roasted pumpkin and it also smells exactly like the pumpkins I roast for pie, minus the pie spice. The tube says, "for all skin type except sensitive." It has a creamy texture with just a small amount of grittiness. Within about 15 seconds of applying this it started to tingle, not in a horrible way but in an almost uncomfortable way. It smells much less pleasant on the skin, almost like roasted pumpkin that's gone slightly sour. I left it on for 5 of the recommended 5-10 minutes. It washed off easily, left absolutely no residue, my skin felt firmer, and definitely looked brighter. The best part? I smelled none of that sour pumpkin scent after rinsing it off! I would use this again. It says on the bottle you can use this every 1-2 weeks, which is doable for me. Overall this is a solid OK product. I can't argue with the results but the scent on my face is almost unbearable. This product is also "Certified Vegan".


Smash Box Photo Finish facial primer $36 for 1oz
You can find this HERE. If you've subscribed to any beauty box of any type, you've gotten a sample of this primer. This claims an Oil Free finish but on me I might as well be slathering my face in butter. I do not have oily skin normally, my skin is generally on the dry side, but this primer brings oil from somewhere deep within my pores right to the surface and jacks up my make up. I always end up giving this to my friend who has oily skin and loves it. So I guess, if you have oily skin, try this out. But if you have dry skin, steer clear. Aside from making my dry skin oily, this has absolutely no scent and has a gel like consistency. It's very easy to get every inch of your face with minimal product, and it absorbs rather quickly leaving almost no residue. My face feels slightly velvety right after applying this but the oiliness sets in after about 30 minutes.


On the left is where I blended it out you'll see it gets lighter towards the top.

MICA Beauty Cosmetics Shimmer powder in Bronze #17 $14.95 for 2.5 grams
You can find this HERE. As far as a loose shadow is concerned this is a huge package. You are getting a ton of product for your money. Bronze is in the Day eyeshadow collection on the MICA website. The color pay off from this is fantastic! Even without a primer, I easily achieved an opaque bronze on my lids without having to pack it on. It also blended out to a nice, extra shimmery, light bronze, which was again, easily achieved. I had minimal fall out from this as well. This could actually be used as a highlighter on your cheeks as too, if used sparingly. This would look gorgeous on fair and dark skin tones, and could go from a day at the office to a night on the town seamlessly. Overall I'm super impressed with this. The only problem I had was that my powder didn't want to come out of the little sifter holes, I had to tap it on my desk pretty hard a couple of times to get enough for my lids. It did come out eventually though so that isn't really a huge problem.


Pixi Beauty Last Booster Mascara in Blackest Black #2 $17 for .25 oz
You can find this HERE.  This comes in 2 shades, Blackest Blue and Blackest Black. The brush is an old school chubby bristle brush, as opposed to rubber nubs or plastic spikey tips you find on a lot of mascara wands, it's fuller at the tip and comes in slightly as it nears the base. Because I smell all of my make up, I'll just point out that this smells like wax, straight up candle wax. This is supposed to be waterproof as well as nourishing. This went on just fine, one dip of the brush coated all of my lashes, top and bottom. It took about 3 passes to get a nice even black  though. It dried a little on the slow side though, maybe 5 minutes at the most. It didn't leave my lashes stiff or clump them together either. As I've said about a million times prior, I have shorter lashes on my left eye then I do on my right, I noticed a slight addition in length and a small curl, nothing to write home about though. Overall it is a decent mascara, I wouldn't recommend it if you are in a desperate need of lengthening or a dramatic curl, but it works just fine.

I just wanted to include all Revolution Lipstick colors


A close up of 69
A side by side with their previous signature red Revolution on the left and 69 on the right.


Urban Decay Revolution Lipstick in 69 $22
You can find these HERE. As with every other Urban Decay lipstick this was incredibly creamy. It was opaque in 2 swipes, and it lasted on my lips (no liner/no blotting/no layering) for about 6 hours with normal wear and tear. I had several glasses of tea and ate a bbq sandwich while wearing this, I had minimal rub off on my glass and none on my food. It did wear down to a nice wash of red in the end, instead of rubbing off and completely disappearing. Prior to this launch UD had a signature red  lipstick (lipstick, not stain, crayon, pencil, or gloss) called Revolution which we will call "R" from now on so it doesn't get confusing. "R" is a color, Revolution Lipstick is a new type of lipsticks UD launched. I swatched them side by side to show the slight difference. 69 is slightly blue based while R seems a little more on the yellow side. R was perfect for me when I had my natural ginger hair but looked horrible once I went platinum. However, 69 is perfect with my blonde hair, which makes me so very happy. The Revolution Lipsticks also have a sleek new packaging, instead of the sword bottom on the regular lipsticks, these are packaged in a shiny silver tube with Urban Decay stamped on the side. While UD is on the pricier side I feel this lipstick is worth it. I fully believe in investing in a nice red lipstick no matter who you are. I mean, unless you're a man who doesn't wear lipstick... or an animal...  I am, however, deeply saddened by them taking away the little sword on the bottom. I love that about my UD lipsticks!


I don't generally add photos of myself to these, but I am not only wearing the Revolution Lipstick in 69 but I'm also wearing the MICA shimmer powder in Bronze on my lids.

 
Just wanted to add in the sword bottomed lipstick tubes so everyone knows what I'm talking about. They are normally plain silver as well, just with the sword on top, I have a cover on mine which is why it looks funky.
As always, if you would like to receive your very own Ipsy Glam bag you can do so right HERE.
The subscription is $10 a month, sometimes there is a small waiting list.
Enjoy! 
 
*Ipsy Glam Bag is a monthly beauty sample bag that I paid for with my very own money. I do not get paid to give good reviews*


Wednesday, July 31, 2013

Food Network's a cake a month June AND July cakes!

So it occurred to me, when I made my "I've been on vacation sorry I've been slacking for this month" post, that I talked about posting July's food network cake and completely forgot about June's cake. In all reality, June's cake was super easy so maybe it's good that I double it with another cake that has about 500 steps to it. I'm being dramatic, not octopus "I'm eating my own legs" dramatic but we are about one step from being THAT dramatic. It really didn't sound that hard in theory, and it has like 5 steps. But it's really messy and by messy I mean freakishly sticky pineapple juice on everything, even though I didn't spill it anywhere.


So first up is the June Berry Ice Cream cake! You'll need the basic chocolate cake recipe which is HERE and you'll also need the assembly instructions HERE.  This wasn't that hard at all, in fact, the hardest part was getting the ice cream to spread on my cake. Mine was too melty so it started to over moisten the cake and it started to stick to my spatula as I attempted to spread it. If I ever did this cake again, I'd haul myself over to Dairy Queen and get some soft serve strawberry ice cream and avoid all of this setting my ice cream on the counter in the hopes that I'll come across it at the perfect time where it's just spreadable and not too melted. Plus, then I could get myself a delicious ice cream treat and not be so sad when I forget about my cake in the freezer and it becomes solid. As easy as the directions were on this, it required way too much attention. Too long on the counter an your ice cream is a mess, too long in the freezer and your cake is solid, too long between serving time and assembly and it's inedible for the next hour or so while your ice cream melts and your cake decides to thaw much much later. In the original recipe you add a little vanilla extract to the whipping cream as you whip it up to perfection, I added almond extract to mine and it was one of the most delicious things I've ever eaten. I love that you don't have to cook the strawberries! It's really nice for warm days when you can make the cake part ahead of time and don't have to turn on the stove to create the rest of the cake. It does require some time for the ice cream to solidify, about 4 hours the recipe says, so plan accordingly. Overall it was pretty delicious and super easy to create, I'm not a fan of the ice cream and cake combo though, so I won't be making it again.


July's cake was a Pina Colada cake! Which was much yummier then it sounds. I was slightly horrified at the thought of this, I'm not a pina colada fan at all, although I do love pineapple and coconut. You'll need the basic vanilla cake recipe HERE and the assembly instructions HERE.
This cake started out just fine until I began brushing the pineapple juice on the cakes, I wasn't sure if I had to brush the entire 1/4cup of pineapple juice on the cakes or what, that just seemed like so much juice so I didn't use it all. I ended up with just a hint of pineapple and only slightly soggy cakes. I used the juice brushed sides as the inside because they were soaked with sticky juice and every time I touched them huge chunks ripped off, I wasn't going to try to frost that junk. Then you've got to cook some dried pineapple down in some coconut cream and pineapple juice, I wondered why it wouldn't just be cheaper and easier to do this with canned pineapple, but I followed the recipe. However, I think it would work just as nicely if not better, with regular canned pineapple, Just drain a little over half the juice out and use the same amount of coconut cream. Anyway, my dried pineapple was soft but not mashable so I ended up with a ton of large pineapple chunks. Again, crushed canned pineapple would have been nicer. This mixture is freakishly sticky, so as soon as you scoop it out, run hot water in your pan and over the utensils you used with it. I used a non stick sauce pan, I would highly recommend that. Also, wipe down your work surfaces the second you've put the pan in the sink, it doesn't matter if you can see any juice anywhere or if you know you haven't spilled any, you have and it's everywhere. You'll thank me when you don't glue your elbow to the counter while you're trying to mix your frosting. Back to the dried pineapple, I had never had this before and it was delicious! There is supposed to be pineapple on top but I ate all the extra and wasn't going to the store for more. If you have a hard time finding the cream of coconut junk, check in your alcoholic drink mixers section. You know, where they have margarita mix and stuff. You could probably find it at a liquor store as well.
This was another butter based frosting, which I find disgusting because I can always taste the butter, so I added a little more coconut cream to it and mixed like there was no tomorrow. It was sooooo good. I could still taste the butter though, and it ended up a little on the salty side, I'd skip the salt all together in this frosting. Overall the filling had a super subtle coconut/pineapple flavor, the vanilla cake had a hint of pineapple, and the frosting was divine, it was a yummy cake! The flavors were more subdued and less in your face like I thought they would be, which worked out really nicely. I would definitely make this cake again, maybe with other fruit, strawberry would be lovely in place of the pineapple with a few tweaks, maybe with sweetened cream instead of cream of coconut. That would be fun to try before the end of this summer!

Let me know if you try any of these cakes, how they turned out, any problems you came across!


Enjoy! 

Thursday, July 25, 2013

Lifeway Kefir

I received a chance, thanks to Influenster, to try the Chocolate Truffle, Raspberry, and Vanilla flavors of the Lifeway Kefir drinks. The kefir itself has a strong tang to it, like a greek yogurt flavor. It is milk shake thick, pourable but still thick in consistency. It's not unpleasant, but it's almost like drinking yogurt.


You can find the Lifeway Kefir website HERE. You can also find a $1.00 off coupon when you buy 2 lifeway products. The definition of Kefir on the website is "Kefir is a cultured probiotic beverage similar in taste and texture to drinkable yogurt, and made from milk fermented with kefir cultures. Originating over 2000 years ago in the Caucasus Mountains-where many people live well over 100 years-kefir has been associated with a long list of health benefits."  I think that sounds actually pretty gross. Fermented milk product. It took a little bit to get over that description so that I could bring myself to try it. I still try not to think about it while I'm drinking it.

This is what they have to say about it on the site, "A fermented milk product, Lifeway Kefir is similar to drinkable yogurt but far more probiotic. While yogurt contains only two to three strains of “live and active” cultures, Lifeway is packed with a unique blend of 12 probiotic cultures."

It boasts that it may help stimulate digestion, lose weight, enhance immune system, alleviate lactose intolerance, IBS, Crohn's, and colitis.
In addition to all of this some of the bottles also say they are 99% lactose free and gluten free which is nice for those people with allergies or special diets. I try to stay away from certain dairy products to keep my skin clear so I appreciated the lactose free part of it.

 I tried the chocolate truffle first, being the chocolate fan that I am. It was sour, bitter, and not a single hint of chocolate flavor. I poured a little out and shook it like there was no tomorrow, thinking that maybe there were some chocolate bits on the bottom that didn't get completely mixed up. I ended up with a whisper of chocolate but it was still full of bitterness, it just wasn't very good. The more I thought about it the less appealing chocolate yogurt flavor seemed, although this isn't yogurt it just tastes like greek yogurt.

The Raspberry was delicious! The Kefir has a strong greek yogurt flavor (although it isn't yogurt) so fruit flavors work really nicely with it. It had a tang with a nice raspberry sweetness behind it. It's a lovely flavor to drink straight in a glass with no add ins. It was sweet but not too sweet, no hint of sourness at all which was lovely after the chocolate truffle flavor.

The Vanilla was perfectly fine. It wasn't amazing or super delicious like the raspberry, but it wasn't disgusting like the chocolate. It had less tang/sourness then the other flavors and more sweetness from the vanilla. It had a strong vanilla flavor, unlike the raspberry and chocolate who's flavor was a background note, vanilla was the prominent flavor here. I enjoyed how versatile this was, I put it in my morning smoothie in place of almond milk, which resulted in a creamier slightly thicker smoothie, and it was fantastic to pour into a bowl of granola in place of almond milk.

YUM! You could use Vanilla or Raspberry this way, depending on your taste, I like the taste of my granola so I prefer vanilla.

I would be very willing to try more fruit flavors from lifeway and will keep an eye out for the frozen kefir which I so desperately wanted to try. My local grocery store only stocked the drinks, much to my dismay. I loved the vanilla flavor in my granola and if I want a creamier morning smoothie, I know where to go. 
*I received 1 Lifeway Kefir product free and 2 discounted Lifeway Kefir bottles complements of Influenster for testing purposes. These are my true and honest opinions, I do not get paid to give good reviews. *


If you would like to sign up with Influenster or learn more about them you can find them right HERE.

Tuesday, July 23, 2013

Ipsy July Beach Beauty Glam Bag


As usual this arrived in my mail box in a beautiful metallic magentaish padded envelope. My first impression of the Beach Beauty Ipsy glam bag is how freakishly adorable the actual bag is! It's a long cylinder shaped zipper mini make up pouch made of clear pink plastic type material. It says "Ipsy ...beauty by you" on the side of it in white. It is raised from the material, and looks painted on, but when I scratched the shit out of it when my nail it didn't budge which is nice. It also has a matte silver zipper handle on it, which is a cute touch.


First up we've got


Big Sexy Hair Weather Proof spray 3.4oz full size $18.95 (although Ulta has a buy 2 get 1 free sale going on right now online)
You can find this HERE. This is a "high-performance humidity resistant spray that promises to leave your hairstyle intact, removing any chance of humidity attacking mishaps." I received a travel size canister, 1.4oz. I generally stay away from sprays because my hair is so thick, it's normally leave in conditioners for me and that's about it.
I'll review this hopefully this week, we haven't been having very many humid days so it's been pointless to try this out.


bhcosmetics California Collection eyeshadow sample trio $9.95 on sale now or $17.95 normally for each eyeshadow/blush palette.
You can find this HERE.  I received a small trio of eyeshadows from each of the 3 collections within the California Collection. We have Hollywood a deep grape purple from the BH Hollywood palette, San Francisco a darkish sandy brown with a shimmer from the bh San Francisco palette, and Malibu a shimmery gold from the bh Malibu palette. They don't sell these separately but they come in a palette that includes 4 blush and 16 eyeshadow colors. The full size palette folds out and includes a mirror, but folds back up into a neat little box as well which is cute for travel.
Hollywood wasn't nearly as dark as I wanted it to be and had a super chalky texture when applied, although it looks gorgeous in the pan, it was almost impossible to build up into a solid color. San Francisco and Malibu had better color pay off and a creamier texture. San Francisco applied with an almost metallic sheen and blended out to a golden light brown. I found it interesting that, like Hollywood, this was also a different color then what I was expecting it to be from looking at the pan.  Malibu didn't disappoint at all. I only needed one swipe for a decent amount of color, it blended out nicely, and went on smooth as butter. It was also the exact color on my lid as it is in the pan, which I love. There is nothing more frustrating to me then to buy an eye shadow color that looks lovely in the pan only to find it's almost a completely different color on my lid.
Overall, I would pass on the chalkiness of Hollywood, but that palette was my favorite on the website, it's really just one color in 4 blush colors and 16 eye shadow colors. San Francisco reminds me of a slightly lighter version of YDK from Urban Decay, which is my go to neutral, the palette is my least favorite though. I do love Malibu, and the palette reminds me of summer time. They are definitely worth a look and you can't beat the price!
From Left to Right, Hollywood, San Francisco, Malibu.


Coola Mineral Sunscreen $36 for 1.7oz
You can find this HERE. Or rather you can find what I think this is there. My tiny bottle says tinted moisturizer while this only says moisturizer. I'm just not sure, but if this isn't it, then it isn't on the website yet. Who knows. Wouldn't be the first time I received something from Ipsy that wasn't on the actual company's website. This says "Keep the sun and environment at bay with this SPF 20 broad-spectrum UVA/UVB sunscreen, a tinted, light Rose scented, Titanium Dioxide based formula (for those who are Zinc sensitive) made with 98% natural ingredients. Organic Acai Oil - high in Omegas-3/6/9, Vitamins B1/2/3, plus antioxidant Vitamins C and E - delivers a powerful defense against aging. Organic Sunflower Seed Extract promotes elasticity while organic Linseed Oil, containing Alpha-Linolenic Acids, reduces redness and irritation. The phyto-protector Plankton Extract rejuvenates, as organic Cucumber Extract c alms skin."
So basically it's a sunscreen that promises to improve your skin as well as protect it. You can't help but love that!
This blended into my skin despite not matching my skin tone. I didn't notice any coverage what so ever though. Even my normal tinted moisturizer has a slight amount of coverage. My skin didn't feel any more or less moisturized after a full day of wearing this, nor did it look or feel any different, and I had to wash my face twice to get rid of the waxy feeling residue. This has a fairly strong scent to it as well, not bad but not fantastic, it's almost a medicine type scent definitely not a light rose scent. It also left my face shiny which isn't uncommon for a sunscreen though. I wouldn't buy this, because I like my normal higher spf $10 sunscreen, I'll leave the skin nourishing to my face creams.
Pop pouty pop crayon on top, Coola mineral sunscreen on the bottom.


POP Beauty Pouty Pop Crayon in Fuchsia Flirt $25 for 6
You can find this HERE. I could only find them being sold as a kit of 6 different lip crayons. They look like chubby pencils, however when you twist the base, it moves the crayon up instead of needing to sharpen it. If you've ever tried to sharpen a chubby lip pencil, you'll know what a pain that is.
I loved the color of this! It is bright but slightly muted on my lips, it was super easy to put on with the pointed tip and chubby sides, it went on smoothly, and the color was opaque with only 2 swipes of the crayon.  However, it settled into my lips and made them look freakishly wrinkled. The color basically settled into the creases in my bottom lip and after about 20 minutes that was all that remained, bright pink lines on my bottom lip. Not a good look. I'll pass.


Demeter Roll On Perfume Oil in Salt Air .29 oz for $10
You can find this HERE. The scent description is "Imagine a perfect sea breeze on the perfect beach at your favorite tropical island. Now you have the perfect description of Demeter's Salt Air."   I love Demeter fragrances, they are priced wonderfully and they come in a HUGE variety of scents from Angel Food to Fresh Hay to Pipe Tobacco to Tangerine.
This isn't my favorite scent but it isn't horrible either. It smells salty, with like a sea breeze air freshener type scent underneath. It's pretty strong, but as it dries it becomes more subtle. I wouldn't buy this for myself, but the Demeter website is definitely worth a look!


If you would like to receive your very own Ipsy Glam Bag you can sign up HERE! It's $10 a month and each monthly glam bag has a theme of it's very own right down to the mini make up pouch. You also take a beauty quiz when you sign up to help personalize your glam bag.

Enjoy!


*Ipsy Glam Bag is a monthly beauty sample bag that I paid for with my very own money. I do not get paid to give good reviews*

Friday, July 19, 2013

Vacation and new reviews!

Well, after 2 weeks of up at the lake fun times, it's wonderful to be home. Don't get me wrong, I love being at the cabin with my family. We have a fantastic time, fishing, mini golf, shopping at the touristy shops, riding through the woods on the 4 wheeler, swimming, taking the boat for a spin around the lake, pizza at the bar.... all good times! But, I never fully appreciate how much I love being home then when I've been away for a while. I love my house, and yard, and life here. I like being at the cabin, but I love being at home. Although, after 2 weeks of wonderfully cool lake breeze weather it was awfully hard to come home to 90 plus temps.

Just wanted to update, I guess I'm not sure if anyone reads this or gives a hoot. But I've got some awesome reviews coming up!

I was chosen to review Lifeway Kefir for Influenster, which is interesting. I'm a kefir novice and, to be honest, the name sounds gross but I'm up for the challenge. I received some coupons in the mail and ended up checking it out at the grocery store today after we got home. They only had the drinks and I was slightly disappointed, the card I got had ice cream on it and I really wanted to try that. Well, life is full of disappointments right? Haha! I ended up getting 3 different yummy sounding flavors. It's lactose free too so I can drink it which makes me super happy!

I also received my July Ipsy glam bag, Beach Beauty! So watch for that one! The bag itself is so super cute!

I also received my July Love With Food box, although I'm not sure I'm going to be reviewing that one, It does have some super yummy looking stuff in there though. I know last month's was full of random gross things and seaweed chips which were so disgusting looking, smelling, and tasting that I just couldn't review that shit.

I'll also be making a new food network cake, Pina Colada cake for July!

Quite a few things to be typing up for this month with 2 weeks left in it, hope you're just as excited as I am!

I'll leave you with a picture of a big ass turtle and my dog enjoying a boat ride... I hope ya'll are having a wonderful summer so far as well.

Enjoy!


Tuesday, July 2, 2013

Strawberry Cream Cheese Bars


These are all the tastes of glitter and rainbows and happiness. Delicious. Lets just talk about them for a second. First you have a thick sugar cookie crust, then a layer of creamy white chocolate spiked cream cheese, and all of it's topped with a fantastic strawberry spread. I based this recipe off of THIS Betty Crocker recipe. Which is interesting that it turned out so good, because I just made a cake off of this website and it was horrible. I went back to my food network cake recipe. I've never known vanilla cake to taste like corn bread before, but the recipe I found totally did. Back to the strawberry bars.

I basically followed this recipe but tweaked it a bit. I feel it's a crime against nature to use boxed mixes for cakes and especially cookies so I used a home made sugar cookie recipe, doubled the cream cheese recipe, and just did my own thing with the strawberry spread. So here is my new and improved recipe for what Betty Crocker calls Strawberries and cream dessert and what I call Strawberry cream cheese bars.

Start with the crust, which is a sugar cookie recipe I found in my grandma's recipe box, I'm sure she clipped it from a magazine at some point but that could have been any time between now and 70 years ago so who knows.

2 3/4 Cups Flour
2 Teaspoons Cream of Tartar
1 Teaspoon Baking Soda
Dash of Salt
1 1/2 Cups Sugar
2 Sticks Butter at room temperature
2 Eggs
2 Teaspoons Vanilla

First, line your baking pan (I used an 8X11 pan but if you'd like to use a larger pan double your sugar cookie recipe) with tin foil and spray it with a cooking spray or grease it with some butter, whatever you prefer. Set it aside and Preheat your oven to 400 degrees.

So you mix all of that together. Use an electric mixer, it takes less time and gets everything blended nicely. Took me about 3 minutes on high with my electric mixer. It might look crumbly, so you'll want to add a bit of water, one teaspoon at a time and mix after each one. Until you get crumbles that are sticking together. A good rule is to take a small handful and smash it in between your palms, if it flattens and sticks together into one solid crust, then it's ready. If you add too much water it will be much too doughy, just add a tiny bit of flour to even it out.

Working quickly, handling the dough as little as possible, dump it into your baking dish and firmly press it into the bottom in one even layer. You need to do this quickly because handling it will warm the dough up and make it super super sticky. If you find your dough has become freakishly sticky already, pop it in the fridge for 10 minutes.

Pop that in the oven for about 20 - 25 minutes or until you can tilt it sideways and get no movement and it's slightly golden on the edges.

Let it cool for at least 30 minutes.

Yes, that is a finger hole in the middle of my crust. You don't have to do this unless you also have a nosey child who feels the need to poke a hole in your crust as well.


Prepare the cream cheese!

2 packages of cream cheese. Whatever brand you'd like. At room temperature.
2 cups white chocolate. I used white chocolate almond bark, about 4 squares, you can always add more if you want more of a chocolate taste. You could also use white chocolate chips which would be easier to melt and measure.

Melt your chocolate either in a sauce pan over medium/low heat or in 30 second intervals in the microwave. Stirring constantly over the stove and after every 30 seconds in the microwave. Melt it until only small chunks remain, take it off the heat, and stir until smooth. This prevents any chance of burning it.

Throw your cream cheese in there, and using an electric mixer, mix it together on high until creamy and well blended.

Scrape this out over the crust and spread an even layer. Put this in the fridge and let it chill out for about 30 minutes to an hour.


The Topping! Almost done I promise!


Strawberries, I used frozen, about 5 handfuls is good.
1 cup sugar, add more if you prefer your topping on the sweeter side. I recommend 2 cups if you'd like it really sweet. I prefer mine a little tart.
Flour
water

(If you'd like to skip this step you could use a nice, thick, strawberry jam instead. This would also work with any other fruit if you want to change it up, blueberries would be fantastic over this as well)

Throw your strawberries in a sauce pan on medium low heat. Add a little water, a little less then 1/4 cup. Put a lid on it and let those berries simmer until soft. Mash them with a potato masher or spoon. If you feel you need more strawberry juice add a little more water at this time.

Add the sugar, and cook about 15 minutes, stirring often. Don't stray too far, if your heat is up too high it likes to boil over so watch out for that.

After the 15 minutes you'll want to throw a little cold water in a measuring cup, about 1/4 to 1/2 a cup. Add about a half a cup to1 cup flour to this. You'll want it pourable but not water thin either. Wisk the flour/water like there is no tomorrow! Until there are not flour chunks remaining, you'll want it very smooth.

Turn the heat under the strawberries up to high and wait for it to boil. Then pour the flour mixture in while constantly stirring until your strawberry mixture is thick. (you may or may not use all the flour mixture)

Remove from the heat and pour over the cream cheese bars. You may need to spread it out with a spatula, just make sure it's evenly covering the cream cheese.

Throw it back in the fridge for at least an hour. Until cold and the topping is set. It should be soft but holding together.

The nice thing about the foil is when you're ready to cut the bars you can pop the entire thing out and you won't have to worry about ruining any by trying to scoop it out of the pan. The sides will be exposed and it will be easy to pull apart.


I hope you try this recipe out! I know it seems like a lot to do but it's not very time consuming, Most of the time is waiting for it to cool. And it's sooooo good!!

As always Enjoy!